Several people have asked me about my latest Server Rig Build. Here it is. This is my second server. I’ll share some details. I prefer to build my own servers and I spare little expense to build exactly what I need. My goal has always been balancing performance with noise reduction since I have my servers running in the house almost 7×24.
My last server build used massive heat sinks for the dual CPU’s to keep the noise down however in this new build I opted for a sound proof case and went with Silent fans.
So, my server build utilizes the Asus Server Board supporting two Intel Zeon processors generating 14 cores each, so I have up to 28 cores and a terabyte of memory. Asus is always rock solid and it’s the only manufacturer I use.
One gotcha was that the Cabinet is designed for a gaming machine so it has nice USB 2.0, USB 3.0 and Audio ports nicely located in the front but being I have a server board, there are not enough connections that can utilize all of these ports.
Lastly, I bought a NAS (Network Attached Storage) from Thecus with 36 Terabytes of Storage in a RAID 10 Configuration. Its enough to store all of my Pictures, Video, Music and Backups.
Here is an itemized list of components I chose for this build. I expect this server to last me at least 5 years.
| Case: |
Cooler Master Ultra Tower II – This provided me the space I needed for the Hard Drives and has seven cooling fans |
| Motherboard |
I chose the Asus Z10PE-D16 WS |
| CPU |
Two Intel Zeon E5-2690V4 2.6 Ghz LGA 2011 135W
BX80660E52690V4 Server Processors from Newegg.com |
| Memory |
Micron CT4K32G4LFD42A – DDR4-2400 LRDIMM
I bought 1000GB of Memory |
| Hard Drives |
4 Crucial 2T SSD Disks
22 250GB Samsung SSD |
| NAS |
Thecus 5810 with 36 Terabytes of Storage in RAID 10 |
Result
I have a very powerful server that is super quiet. With 26 Disks all aligned for Hyper-V I have begun to setup sever virtual machines to support Active Directory, SQL Server, SharePoint, Project Server, SQL Reporting Services, CRM and Exchange. The SQL Server is configured with HA (High Availability) within a Failover Cluster. A separate load balancing virtual machine handles SharePoint App and Web Front Ends. Everything locked down internally via its own VLAN.
Photos: Click on the Image to see full view.
Cabinet Internals

Cabinet

Thecus NAS (Next to 1500W UPS)

Screenshot of Drives

Share Point Administrators will often at times Pre-Provision User’s MySites once their information has been created in Active Directory. However, when this is done I have noticed that the “Access Request e-Mail Address” was left with “somebody@example.com”. This causes an issue when users request access to someone’s MySite by throwing an “Undelivered” response back to the user’s InBox.
Here is a PowerShell scripting I recently wrote to enumerate through each active MySite and update the e-mail address. The e-Mail is derived from the UserProfile settings. Feel free to use it or improve on it. Happy SharePointing!
#*******************************************************************************
# Filename: SP-UpdateMySitesAccessRequest.ps1
# Author: Paul D. Fox
# Version: 1.1
# Last Modified: 12-26-2019
# Description: This script will Update the Access Request e-mail address
# for each MySite User based on their UserProfile Settings.
#
# Modifications: MM/DD/YYYY – Description
# Note: Requires entering the Web Application (root) Url for MySites
# Execution: Execute from Windows or SharePoint PowerShell
# (As Administrator) with the command:
# .\SP-UpdateMySitesAccessRequest.ps1
#
#*******************************************************************************
Add-PSSnapin Microsoft.SharePoint.PowerShell -ErrorAction SilentlyContinue
Write-Host “Microsoft.SharePoint.PowerShell Snap-In Added…” -ForegroundColor Green
Write-Host
#*******************************************************************************
$siteUrl = Read-Host “Enter the Web Application Url [https://mysite.contoso.com]” `n
$rootSite = New-Object Microsoft.SharePoint.SPSite($siteUrl)
$spWebApp = $rootSite.WebApplication
$count = 0
foreach($site in $spWebApp.Sites)
{
foreach($siteAdmin in $site.RootWeb.SiteAdministrators)
{
#Write-Host “$siteAdmin.ParentWeb.Url – $siteAdmin.DisplayName – $siteAdmin”
if ($siteAdmin.Email -ne “”)
{
#Get Site Collection Administrator e-Mail
$requestAccessEmail = $siteAdmin.Email
$count = $count + 1
foreach($web In $site.AllWebs)
{
If($web.HasUniquePerm){
$web.RequestAccessEmail = $requestAccessEmail
$web.MembersCanShare = $false
#Disable “Allow members to share the site and individual files and folders”
#Disable “Allow members to invite others to the site members group”
$groups = $site.RootWeb.sitegroups
foreach ($grp in $groups)
{
$grp.OnlyAllowMembersViewMembership = $false;
$grp.AllowMembersEditMembership = $false;
$grp.update()
}
$web.Update()
Write-Host “Updating AccessRequest eMail for: ” $requestAccessEmail -ForegroundColor Gray
}
}
}
}
$site.Dispose()
}
$rootSite.Dispose()
Write-Host
Write-Host $count “Total Access Request e-Mails Updated!” -ForegroundColor Green
40.535267
-79.940226
 The SharePoint Search Service Crawler and Indexer uses the “Title” property first when content is indexed. A new feature in SharePoint 2016 has the crawler picking up the first line or “header” of the document to help with indexing content. By adding a Title to documents, SharePoint search will provide a better UX (User Experience) with SharePoint’s Search Results when users are searching for content.
By default the Title content in Document Libraries is not required, leaving many lazy users not filling out this field. This could potentially give incorrect search results or results that are confusing.
You can easily set the Title to Required by going into the Document Content Type, but if there are many Libraries in Sites and Site Collections that could be cumbersome.
You can create a Feature (List Event Receiver) when a Library is provisioned to set the Title to required, and for existing libraries that can also be accomplished via PowerShell.
In this example, I have the Title property set during the provisioning process.
Public Class TitleRequired
Inherits SPListEventReceiver
”’
”’ A list was added.
”’
Public Overrides Sub ListAdded(properties As SPListEventProperties)
MyBase.ListAdded(properties)
Dim sSiteUrl As String = properties.Web.Site.Url
Dim sWebUrl As String = properties.Web.Url
Dim sLibraryName As String = properties.ListTitle
‘*************************************************************************************************
‘Note: Making the Title Column (Field) Required in a Document Library is Different from a
‘ Custom List. The “Document” Content Type Associated with the List requires the Change.
‘
‘ If Deactivating this Feature, you will need to Manually Set the Title Required proprety
‘ through the “Document Content Type” under “Allow Management of Content Types”.
‘*************************************************************************************************
Try
Using site As New SPSite(sSiteUrl)
Using web As SPWeb = site.OpenWeb()
Dim list As SPList = web.Lists.TryGetList(sLibraryName)
Dim contentType As SPContentType = list.ContentTypes(“Document”)
Dim titleField As SPField = list.Fields(“Title”)
Dim fieldLink As SPFieldLink = contentType.FieldLinks(titleField.Id)
web.AllowUnsafeUpdates = True
fieldLink.Required = True
contentType.Update()
web.AllowUnsafeUpdates = False
End Using
End Using
Catch ex As Exception
‘Throw a message in the ULS Logging
Microsoft.Office.Server.Diagnostics.PortalLog.LogString(“Exception Occurred ATI.SP.ER.SetTitleRequired: {0} || {1}”, ex.Message, ex.StackTrace)
End Try
End Sub
End Class
I recently upgraded to the new Microsoft Visual Studio 2017. When I tried to open projects created in the earlier version (Visual Studio 2015), I encountered a running issue where it continuously asked to install the Visual Studio Tools for Office. The problem was that they are already installed with Visual Studio 2017 when I selected the Office Tools & SharePoint products during the Install.
It seems the versioning has not been updated correctly during either the Migration, or the Upgrade. Since this product is so new, I don’t know if this is the official remedy but here is how I fixed it.
Solution:
Open the Project File (e.g. .vbproj or .csproj) file and update the “MinimumOfficeToolsVersion” to 14. Sometimes I noticed the value varied from 14.5 to 14.6

Happy SharePointing!
Problem
You may have come across this issue in your Intranet. Let’s say you create your Intranet with several Sub-Sites and utilize the Managed Metadata Navigation to manage the Top Link Bar. This Managed Metadata Navigation is inherited across and down through all of the Sub-Sites.

Now, when you click on the ‘Add a Page’ from the “Find it at: <URL>” displays the wrong address or at most the <Root> of the Site Collection.
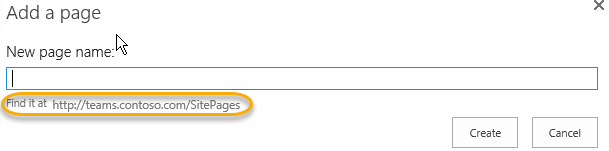
What you want to happen in a Publishing site, is to have the New Pages Added, added to the Pages library of the site or Sub-Site you are creating it from.
Resolution
Uncheck the “Create friendly URLs for new pages automatically” in the Navigation Settings of the Site or Sub-Site should resolve this issue.

Result:
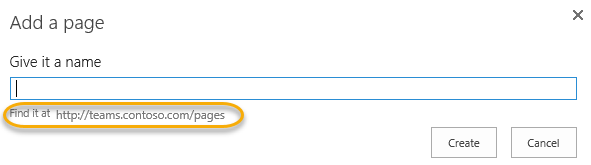
Note:
If you have the Publishing Infrastructure and Publishing Feature enabled on a Team Site, it will default to “/SitePages”. This is because by default the “Wiki Page Home Page” Site feature is enabled by default when a Team Site is provisioned. Simply Disable this feature and your New Pages will be added to the “/Pages” Library.
Happy SharePointing!
You can remove the Recent Node in the Quick Launch (Current Navigation) in SharePoint 2016 without having to write code or deploy CSS changes. This should also work on SharePoint 2013 as well.
Steps
- First create a New SharePoint Security Group in your Site Collection. This group only needs “Read” permissions.

2. From “Site Settings”, “Navigation”, select the Recent Link in the Current Navigation section and click on the “Edit” menu item in the Navigation box.

3. Next, select the “Target Audience” and add the New SharePoint Permission Group you created.
That’s it. Now all you have to do is Add users to your new group if they need to see the “Recent Node”
I’ve been working with SharePoint 2013 for some time now and now eagerly reviewing the new SharePoint 2016. I noticed that when users provision their Blogs on their My Sites, the title default to “Welcome to My Blog”. The eventual result of this becomes more apparent when they show up in the search results.
Here I decided to incorporate a feature stapler while working on a custom branded My Sites Masterpage. This feature will, when a My Site Blog is provisioned, renames the Blog Title to “Welcome to <DisplayName>’s Blog. Now when you search on Blogs it makes it more clear as to who blog it is.
So I in my Visual Studio Project, I created an Event Handler called “MySiteWebProvisioning” with the following code:
Imports System

Imports System.Security.Permissions

Imports Microsoft.SharePoint

Imports Microsoft.SharePoint.Utilities

Imports Microsoft.SharePoint.Workflow

Imports Microsoft.Office.Server
Public Class MySiteWebProvisioning
Inherits SPWebEventReceiver
”’ <summary>
”’ A site was provisioned.
”’ </summary>
Public Overrides Sub WebProvisioned(properties As SPWebEventProperties)
MyBase.WebProvisioned(properties)
Using targetWeb As SPWeb = properties.Web
Using rootWeb As SPWeb = targetWeb.Site.RootWeb
‘******************************************************************************************
‘* Set MySite Blog Title to Display Name’s – Blog. When these MySite Blogs
‘* are Crawled, they will have return “User DisplayName’s – Blog rather than just “Blog".
'******************************************************************************************
If properties.Web.Site.HostName = “mysites.portal.contoso.com” Then
If properties.Web.WebTemplateId = “9” Then
Try
Dim spResource As SPUserResource = properties.Web.TitleResource
Dim sWebUrl As String = properties.ServerRelativeUrl
Dim sUserDisplayName As String = properties.UserDisplayName
properties.Web.Title = sUserDisplayName + “‘s – Blog”
properties.Web.AllowUnsafeUpdates = True
properties.Web.Update()
Catch ex As Exception
‘Throw a message in the ULS Logging
Microsoft.Office.Server.Diagnostics.PortalLog.LogString(“Exception Occurred Ascii.SP.ER.MySiteBranding: {0} || {1}”, ex.Message, ex.StackTrace)
End Try
End If
End If
‘Update Blog MasterPage
targetWeb.MasterUrl = rootWeb.MasterUrl
targetWeb.CustomMasterUrl = rootWeb.CustomMasterUrl
targetWeb.SiteLogoUrl = rootWeb.SiteLogoUrl
targetWeb.AlternateCssUrl = rootWeb.AlternateCssUrl
targetWeb.Update()
End Using
End Using
End Sub
End Class
Here is the Element.xml
<?xml version=”1.0″ encoding=”utf-8″?>
<Elements xmlns=”http://schemas.microsoft.com/sharepoint/”>
<Receivers >
<Receiver>
<Name>MySiteWebProvisioningWebProvisioned</Name>
<Type>WebProvisioned</Type>
<Assembly>$SharePoint.Project.AssemblyFullName$</Assembly>
<Class>Ascii.SP.ER.MySiteBranding.MySiteWebProvisioning</Class>
<SequenceNumber>10002</SequenceNumber>
</Receiver>
</Receivers>
</Elements>
In my Feature Stapler, I associated it with the MySite Template. The Elements.xml for this is displayed below:
Elements.xml
<Elements xmlns=”http://schemas.microsoft.com/sharepoint/”>
<FeatureSiteTemplateAssociation Id=”c4c9b0b4-c604-4ec0-8355-3136fd02411b” TemplateName=”SPSPERS#2″ />
</Elements>
Happy SharePointing!
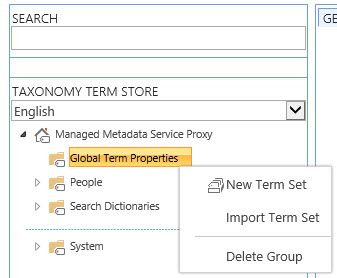
Another method of getting your Termsets into the Managed Metadata Store is of course to just import them. I have several pre-defined termsets that you can use.
Step 1 – From the Managed Metadata Store in SharePoint Central Administration, I created a “Global Term Properties” Group. This will be where I create termsets to be used by everything in the entire farm.

Step 2 – Upload your defined terms saved a Microsoft Excel Workbook or Comma Delimited File (.csv)

Step 3 – Review your Imported terms

To show you how I created these Excel files, I have several below that you can download, experiment with, or just use.
Bismarck!
This took quite some time to gather and place into a Microsoft Excel worksheet but I persevered through the tedious effort to build a TermSet of what I call the “Schools of the World”. This PowerShell script will populate a “Schools” termset with all of the known (as of today) Colleges and Universities on planet Earth.
To run, execute PowerShell as an Administrator or the SharePoint Setup Account. Navigate to the folder where the Script and .CSV file reside and type
.\SP-ImportTermSet.ps1 http://mysites.portal.contoso.com SchoolsTermSet.csv
This will add a “Schools” termset under the “People” Term Group.
Note: if “Schools” has not already been provisioned, your will need to run the script twice. First to provision the termset, and second to populate it with the terms.
Download the SchoolsTermSet and rename it to SchoolsTermSet.csv, then copy the PowerShell Termset Installer below as SP-ImportTermSet.ps1.
PowerShell Script: SP-ImportTermSet.ps1
#*******************************************************************************
#* Author: Paul D. Fox
#* Date: 05/08/2014
#* Description: PowerShell Script to Import TermSets into the Managed Metadata
#* Term Store from a .CSV of specified terms.
#*
#* Modifications: MM/DD/YYYY – Description
#*
#* Execution: Modify the parameters below to coincide with your Farm
#* Credentials, Managed Metadata Service Name, and Term Group
#* Description. To run this script create open the SharePoint
#* Management Shell and Execute the following from the directory
#* where the .csv resides.
#*
#* To Execute, type the following:
#* .\SP-ImportTermSet.ps1 “http://mysites.portal.contoso.com” “SchoolsTermSet.csv”
#*
#*******************************************************************************
param(
[string]$siteUrl,
[string]$inputFile)
[string]$termStoreName = “Managed Metadata Service Proxy”
[string]$termGroupName = “People”
[string]$termGroupDescription = “Term Store used to Extend User Profile Information”
[string]$termGroupMgr = “CONTOSO\SPFarmAdmin”
[string]$termGroupContributor = “CONTOSO\SPFarmAdmin”
[string]$termSetDescription = “Schools”
[string]$termSetOwner = “CONTOSO\SPFarmAdmin”
[string]$termSetStakeholder = “CONTOSO\SPFarmAdmin”
#Add the SharePoint PowerShell Snap-In
Add-PSSnapin Microsoft.SharePoint.PowerShell -ErrorAction SilentlyContinue
#*******************************************************************************
#* Check if both params are passed, else show Syntax.
#*******************************************************************************
if ($siteUrl -eq “”)
{
“Syntax: S2-ImportTermSet , ”
exit;
}
if (-not($siteurl.ToLower().StartsWith(“http`://”)))
{
“Invalid Web Application Url”
“Syntax: Build-CbMySites ”
exit;
}
if ($siteurl.EndsWith(“/”))
{
$siteurl = $siteurl.Substring(0,$baseUrl.Length -1)
}
#*******************************************************************************
# [string]$siteUrl = $(Read-Host -prompt “Site Collection URL”),
# [string]$termStoreName = $(Read-Host -prompt “Term Store Name”),
# [string]$termGroupName = $(Read-Host -prompt “Term Group Name”),
# [string]$termSetName = $(Read-Host -prompt “Term Set Name”),
# [string]$inputFile = $(Read-Host -prompt “Input File (including full path)”))
#*******************************************************************************
[Reflection.Assembly]::LoadWithPartialName(“Microsoft.SharePoint.Taxonomy”) > $null
function Get-SpTermGroup
{
$termGroup = $termStore.Groups[$termGroupName];
if ($termGroup -ne $null)
{
return $termGroup
}
else
{
$termGroup = $termStore.CreateGroup($termGroupName)
$termGroup.Description = $termGroupDescription
$termStore.CommitAll()
$termGroup.AddGroupManager($termGroupMgr)
$termGroup.AddContributor($termGroupContributor)
$termStore.CommitAll()
return $termGroup
}
}
function Get-SpTermSet([string]$termSetName)
{
$termSet = $termGroup.TermSets[$termSetName];
if ($termSet -ne $null)
{
return $termSet
}
else
{
$termSet = $termGroup.CreateTermSet($termSetName)
$termSet.Description = $termSetDescription
$termSet.Owner = $termSetOwner
$termStore.CommitAll()
$termSet.AddStakeholder = $termSetStakeholder
$termStore.CommitAll()
return $termSet
}
}
function Add-SpTerm([string]$termName, $parentTerm)
{
try
{
if ($parentTerm -eq $null)
{
$term = $termSet.CreateTerm($termName, 1033);
}
else
{
$term = $parentTerm.CreateTerm($termName, 1033);
}
if ($term -eq $null)
{
Write-Host “Term $termName could not be created” -ForegroundColor Red
}
else
{
$term.IsAvailableForTagging = $available ;
write-host “Term $termName has been created”
if ($synonyms.Count -gt 0)
{
foreach ($synonym in $synonyms)
{
$term.CreateLabel($synonym,1033, $false);
write-host ” Synonym $synonym has been created”
}
}
$termSet.TermStore.CommitAll();
}
}
catch { }
return $term
}
function Get-SpTerm([string]$termName, $parentTerm)
{
if ($parentTerm -ne $null)
{
$term = $parentTerm.Terms[$termName];
}
else
{
$term = $termSet.Terms[$termName];
}
if ($term -eq $null)
{
$term = Add-SpTerm $termName $parentTerm
}
return $term
}
function Import-SPTermStoreGroupTerms
{
$isValid = $true;
$message = “”;
if ($siteUrl.Length -eq 0)
{
$message = “`nPlease provide a site URL”;
$isValid = $false;
}
if ($termStoreName.Length -eq 0)
{
$message += “`nPlease provide a Term Store Name”;
$isValid = $false;
}
if ($termGroupName.Length -eq 0)
{
$message += “`nPlease provide a Term Store Group Name”;
$isValid = $false;
}
if ($inputFile.Length -eq 0)
{
$message += “`nPlease provide an input file”;
$isValid = $false;
}
else
{
$csv = Import-csv -path $inputFile
if ($csv -ne $null)
{
[string]$termSetName = $csv[0].”Term Set Name”;
if ([string]::IsNullOrEmpty($termSetName))
{
$message += “`nPlease provide a Term Set Name”;
$isValid = $false;
}
}
else
{
return “Argument supplied for input file was invalid.”;
}
}
if ($isValid -eq $false)
{
write-host “`n`nERROR OCCURRED`n`t$message`n`n”
write-host “NAME`n`tImport-SPTermStoreGroupTerms`n”
write-host “SYNOPSIS`n`tConsumes a CSV file containing a listing of term names and creates them if needed in the specified term set.`n”
write-host “SYNTAX`n`tImport-SPTermStoreGroupTerms siteUrl termStoreName termGroupName termSetName inputFile`n”
write-host “EXAMPLES`n`n Import-SPTermStoreGroupTerms “”http://sp2010″” “”Managed Metadata Service”” “”Enterprise Metadata”” “”Business Units”” “”C:\Users\Me\Desktop\input.csv””`n”
write-host “SAMPLE INPUT FILE`n`tTerm`n`tSample Term 1`n`tSample Term 2`n`tSample Term 3`n”
return;
}
try
{
$ErrorActionPreference = “Stop”;
try
{
$taxSession = Get-SPTaxonomySession -Site $siteUrl;
try
{
$termStore = $taxSession.TermStores[$termStoreName];
if ($termStore -ne $null)
{
try
{
$termGroup = Get-SpTermGroup
if ($termGroup -ne $null)
{
try
{
$termSet = Get-SpTermSet $termSetName
if ($termSet -ne $null)
{
foreach($line in $csv)
{
$available = $false
$synonymList= $null
$synonyms = $null
[string]$termName1 = $line.”Level 1 Term”;
[string]$termName2 = $line.”Level 2 Term”;
[string]$termName3 = $line.”Level 3 Term”;
[string]$termName4 = $line.”Level 4 Term”;
[string]$termName5 = $line.”Level 5 Term”;
[string]$termName6 = $line.”Level 6 Term”;
[string]$termName7 = $line.”Level 7 Term”;
[string]$switch = $line.”Available for Tagging”;
[string]$synonymList = $line.”Synonyms”;
if (-not ([string]::IsNullOrEmpty($synonymList)))
{
$synonyms = $synonymList.Split(“|”);
}
if ($switch.ToLower() -eq “true”)
{
$available = $true
}
#Get Level 1 Term
$term = Get-SpTerm $termName1
if (-not ([string]::IsNullOrEmpty($termName2)))
{
$term = Get-SpTerm $termName2 $term
if (-not ([string]::IsNullOrEmpty($termName3)) )
{
$term = Get-SpTerm $termName3 $term
if (-not ([string]::IsNullOrEmpty($termName4)) )
{
$term = Get-SpTerm $termName4 $term
if (-not (![string]::IsNullOrEmpty($termName5)) )
{
$term = Get-SpTerm $termName5 $term
if (-not (![string]::IsNullOrEmpty($termName6)) )
{
$term = Get-SpTerm $termName6 $term
if (-not (![string]::IsNullOrEmpty($termName7)))
{
$term = Get-SpTerm $termName3 $term
}
else
{
return “Error: Term Name Left Blank”;
}
}
}
}
}
}
}
}
else
{
return “Termset $termSetName does not exist in the term store group $termGroupName”;
}
}
catch
{
“Unable to acquire the termset $termSetName from the term group $termGroupName”
}
}
else
{
return “Term store group $termGroupName does not exist in the term store $termStoreName”;
}
}
catch
{
“Unable to acquire term store group $termGroupName from $termStoreName”
}
}
else
{
return “Term store $termStoreName does not exist”;
}
}
catch
{
“Unable to acquire term store for $termStoreName”
}
}
catch
{
“Unable to acquire session for the site $siteUrl”
}
}
catch { }
finally
{
$ErrorActionPreference = “Continue”;
}
}
Import-SPTermStoreGroupTerms
Remove-Variable * -Scope Local -ErrorAction SilentlyContinue
Bismarck!
Building upon the SharePoint Governance Plan document that I posted the other day, I began creating a Development Standards document for SharePoint. This is something of a good idea if you either have a large team of designers and developers enhancing and extending the SharePoint platform. In addition, its good idea to have some kind of standards document for your organization when utilizing contractors or consultants as additional resources that will only be available temporarily.
This is my first draft at such a document. It covers both SharePoint 2010 and SharePoint 2013. I still have some images to add to the document (you will see my placeholders), and I don’t have much of anything for Standards on App Model development. If you already have standards for this I’d love to hear about it.
So in the spirit of sharing my work, feel free to download this SharePoint Development Standards Development Document. Hopefully I will get the time to move it out of draft state soon.
Download the SharePoint Development Standards Document.
Bismarck!